上QQ阅读APP看书,第一时间看更新
Deploying the API Gateway
Now that the API Gateway has been tested, let's deploy it to an environment. The environment, in API Gateway terms, is called the stage.
To create a stage click on the Actions drop down and selecting Deploy API. Select the New Stage option in the Deployment Stage dropdown and name it beta by supplying the value for Stage Name. Leave every thing to defaults and click on Deploy.
We land up on the following screen:

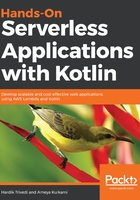
Creating the stage beta
A few things to note are as follows:
- An HTTPS-enabled URL came with our application, out of the box. The base URL is https://8uf5e3eccd.execute-api.us-west-1.amazonaws.com.
- We created a stage name, beta, so the URL has now become https://8uf5e3eccd.execute-api.us-west-1.amazonaws.com/beta/.
- We created a resource name, /greeter, so the URI to invoke it has become https://8uf5e3eccd.execute-api.us-west-1.amazonaws.com/beta/greeter/.
Up to this point, we have not enabled authentication on our API, so it is open to the world. Even though this API is not doing much, it is possible that it could be hit with a lot of requests in an attempt to break the API. Authenticating it is always a good idea in order to protect the APIs that you create.